 |
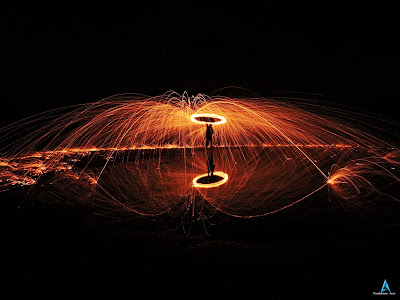
| Steel Wool Photography by Pondicherry Arun |
Steel Wool Photography is using long exposures to capture the motion of hot embers flying through the air through the act of spinning burning steel wool. These embers are so hot that they glow very brightly, and as they fly through the air the camera sensor captures the streaks of light created.


How to Take Steel Wool Photographs
Fluffing the wool as it is seen on the right before stuffing it into the whisk creates the best sparks.
This is where the fun begins
Attach the whisk to the rope or chain. I like to keep the length around 2 ft.
Take a piece of steel wool and stuff it inside the head of the whisk. Don’t pack it in too tight as air will have to flow through it for it to burn. I like to “fluff” the out a bit before putting it in the whisk. This makes for better sparks.
Light the wool using the lighter. You don't need the wool to be on fire, just a few parts to be glowing or making sparks is all you need. The air moving through as you spin it will ignite the wool and cause the sparks to fly.
Holding the other end of the rope or chain spin the wool in a circle causing the sparks to fly from the end of the whisk.
Just as the person starts spinning, press the shutter button on the camera to capture the image. If shooting at 10-second exposures then you should be able to capture 2-3 frames before the steel wool burns out completely.
As a note, you should practice spinning the whisk on the rope a few times before attempting it with the burning wool. Especially, practice stopping the spin slowly without hitting yourself with the whisk. This may sound trivial, but if the whisk hits you while you are trying to stop it you will get burned. It gets extremely hot during the process. I also like to keep a bucket of water nearby, if I'm not near a lake/ocean, to dip the whisk in after and cool any remaining hot wool before refilling it with more steel wool.
 |
| Steel Wool Fire Sparks Reflect on the Water |
What camera settings should you use?
Adding a glow stick can create a nice “Eye Effect”.
As mentioned above you will want to set your camera in manual mode to capture the long exposure. Because of this, the best time of day to steel wool photography is twilight and dark. You could do it in daylight with an ND filter but the sparks aren't usually bright enough for the best effect. So wait until the sun goes down or go before it rises for the best images.
Shutter speed: This is probably the most important aspect of the shot. You want to capture enough of the movement to show the streaking lights caused by the flying sparks. I generally shoot at exposures between five and twenty seconds.
Aperture: Ideally you want to choose an aperture that keeps the entire scene in focus. So I like to shoot between f5.6 and f11.
ISO: Keeping your ISO low will keep you from blowing out the brightness of the steel wool when it is lit. This means you can retain the color detail and adjust the color temperature and saturation in post-processing which will give more opportunity to be creative. I usually shoot at ISO 100 or 200 for this reason.
My go to settings are 10 seconds, f8, and ISO 200 for most steel wool shots I take.
Expose for the foreground or the hot wool? Both?
There are a few ways to do this depending on the available light. If it is twilight or there is a big moon in the sky, or other ambient light sources nearby you can expose for a long exposure and the surrounding environment at the same time; this is an ideal situation. At other times particularly in very dark locations, you may want to capture the environment using a longer exposure, wider aperture, or Higher ISO before or after shooting the steel wool and then blend the two in post processing. There is no right or wrong way to do this; it just depends on your vision for the photo and your post processing skills.


0 Comments